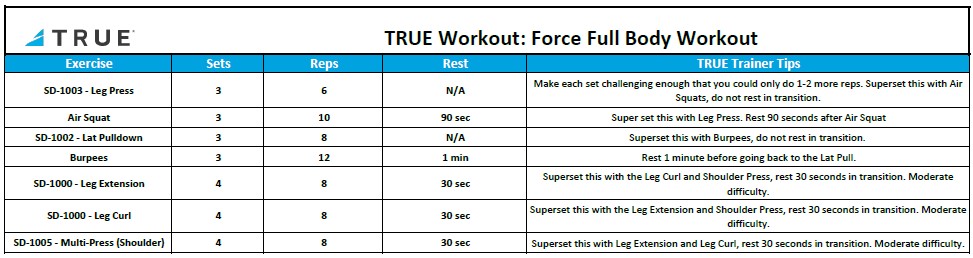
TRUE Workout: FORCE Yourself To Be Strong
If you are looking to target all major muscle groups in your body with varying movements, this is the workout for you. The FORCE Yourself To Be Strong workout uses pieces from TRUE’s FORCE line of strength equipment.
Before You Begin This Workout
Before beginning a strength training exercise like this, getting a complete warm-up in is highly important. In addition to stretching or foam rolling, it would be beneficial to incorporate some cardio into your warm-up to really get the heart pumping and your body ready to work with weights.

When you get to the first machine, complete 3 to 4 warm-up sets so your body can get used to the movement and so you can find a comfortable, but challenge amount of weight. Each set should be gradually increased to help you find the weight you will use for the work sets.
An example Leg Press:
- 40lbs x 6
- 70lbs x 6
- 90lbs x 6
- 100lbs x 6 (this set of 100lbs was challenging so this will be your first of 3 work sets)
To adjust this workout for your skill level there are a few things to consider:
- For a Beginner user: Use a weight that is moderately challenging but enables you to keep perfect form with every rep.
- For an Intermediate user: Use a weight that is challenging to complete all your sets.
- For an Advanced user: Use a weight that is very challenging to complete the first set, rest around 3 to 4 minutes and complete it again at the same weight. This will help maximize strength adaptations.
Proper Forms To Remember For This Workout
- Leg Press
- Start with your feet in the middle of the platform and about shoulder width apart with your toes pointing outward about 30 degrees. Your knees should be bent a little past 90 degrees. To be sure you are starting at the right depth, simply adjust the back pad forward or backward to achieve desired bend in knee. Once set up properly, keep even pressure from heel to toe, you should feel the weight mid foot. Keep your knees pushed out and push into the platform until your legs reach almost full extension. Do not lock out or “hyperextend” your knees. This can result in injury. Return back to the starting position slowly until the weight stack is just above resting position and press again.
- Air Squat
- Begin with your feet shoulder width apart with your toes pointing outward about 30 degrees. Keep even pressure from heel to toe, you should feel the weight mid foot. Bend at your knees and hips at the same time, while pushing your knees out. Keep going down till you are below the height of a chair. Then, while standing back up try to push your hips to the ceiling, then stand up straight.
- Lat Pull
- Sit facing the machine and adjust the thigh pad so that it fits snug on top of your thighs. Choose your weight, stand up grab the handles just outside of your shoulders, sit down with your thighs under the pad. Next, pull the bar down to just below your chin. Try to squeeze your shoulder blades down and together. Return the bar back overhead with your arms fully extended and repeat.
- Burpee
- This movement is about efficiency and not as much about form. Many people will perform this much differently because of safety reasons and their own ability. With a burpee, you want to go from a standing position to a prone position (laying on your chest) back to a standing position. Jump downwards forcing yourself to the floor and once your chest touches the floor, immediately push yourself up and jump your feet underneath you and stand back up with your feet leaving the floor at the standing position. That is one rep.
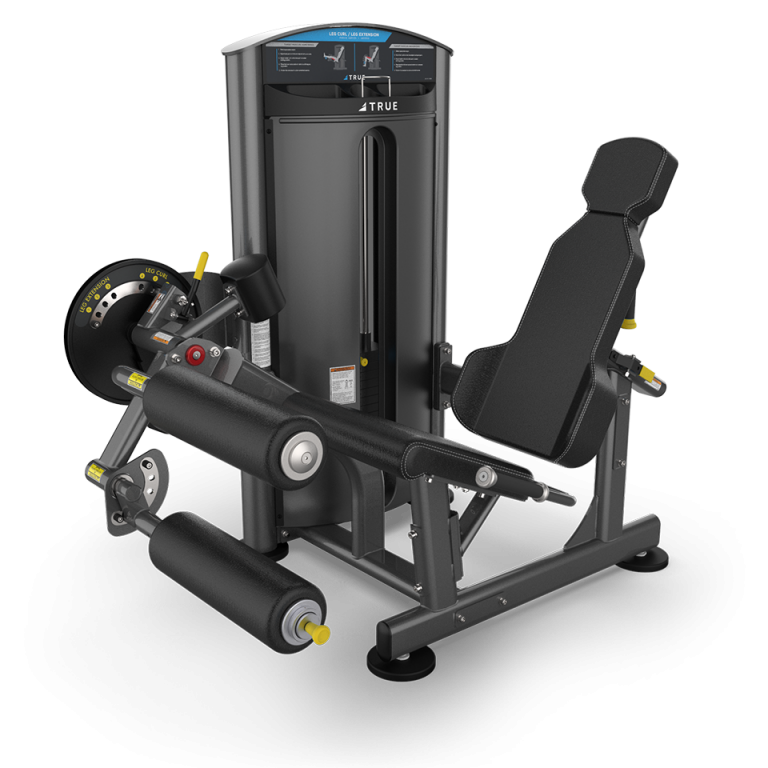
- Leg Extension
- Once seated on the machine, set the lower leg pad up so that your legs are bent back a bit underneath the seat and the pad is just above your ankles. Use the seat back setting to be sure the back of your knees is flush against the seat. Keep the top pad up and out of the way. Grip the handles when you extend slowly and extend your knees as much as you can and hold the top position for a 1 count (legs should be straight at the top). Then return the weight slowly not letting the weight stack come to rest and repeat.
- Seated Leg Curl
- You will now move the lower leg pad up to near the seat level. Once seated place your legs on top of the pad farthest from you, with the pad just above the ankles. Then move the pad that’s closer to you down snug on top of your thighs. When you begin the movement, grasp the handles and curl your feet under your butt as far as you can, hold this bottom position for a 1 count. Then let your legs come back up, but not all the way back to that resting position. At the top you should have a slight bend in your knees, and repeat.
- Shoulder Press
- Position the back pad so that it is near upright. Grab the handles closest to your shoulders; adjust the seat so that when you grab the handles they are slightly above shoulder level. Keep your wrists neutral and press the handles up. At the top, push the handles as far away from you as you can and shrug your shoulders. Return the handles just above your shoulders and repeat. Be sure to keep your elbows slightly in front of your hands at the bottom.
The Exercise
Final Thoughts
Always focus on the form with each movement and rep. This is very important on lower body movements because lack of proper form could lead to knee or back injuries. Make each set somewhat challenging but not to the point where your form begins to fail.
Log your weights used and simply repeat this workout in a week or so to see how much better you have gotten. Legs can tend to get fairly sore from these type of workouts, so make sure you stay active, eat enough food, and rest enough. All these factors will help you recover faster.